Beginner guitar lesson
Beginner guitar lesson
Beginner Guitar Tutorial: Introduction
This guide is devised to lead you through the fundamentals of guitar playing and the introduction of the instrument itself. It’s meant for people who have just picked up the guitar for the first time, and don’t know where to start.
Nowadays with the internet at our service, everything seems so easy. But, on the other hand, all the information one can find might be overwhelming, especially if you are a beginner. That’s why we’ll break everything to smaller pieces, in order to master the basics. You might want to read the commonly asked FAQ guide by our students over the past years.
Like with everything in life, there are no shortcuts with learning how to play an instrument as well. That’s why it’s important to read everything carefully and to go through each step slowly until everything flows.
During this course, we’ll talk about everything, from how to hold the guitar, how to tune it, how to exercise your fingers and hands, all the way to how to play and write songs. No matter what kind of music you wish to pursue with your playing, it’s important to have fun on your way to perfection.
About the Author
Hello, my name is Ryan Wong and like most of you reading this book I was also confused with a lot of things when I grabbed my first guitar. I’ve started learning how to play myself, but until I got a few guidelines I couldn’t do anything. Afterward, when I learned basics, I managed to overcome every obstacle in my playing.
Today I’m a professional musician, composer, and a songwriter, with quite a lot of mileage, both onstage and in the studio. If at any point you find a lesson fatiguing, take a break, and return to your practice later. I remember I had a hard time learning too. But trust me, once your mind is set into guitar mode, you won’t be able to leave it ever again. Enough with the talk, let’s get down to business.
Practicing

This might sound strange at first, but playing an instrument is just like playing a sport. You have to practice regularly and try not to overdo it. Like in sports, you can easily get hurt playing as well. Your hand and fingers are not used to this kind of stress, so there is no need to push them even more. It’s important to set a daily routine before the muscles you’ll use when playing are ready to endure longer use.
Acoustic guitars, especially ones with metal strings are a bit harder to play than the electric. This is the reason why you should start with a classical guitar. Its strings are softer, while the action on the neck is somewhere between the acoustic and the electric guitar. This way you won’t have any trouble switching to either. If you wish to strengthen your guitar muscles faster, you can get a sports hand gripper and use it a few minutes per day.
Before you pick up a guitar be sure to have two things: A metronome, and a notebook.
The metronome will become your best friend over the time, trust me. This device divides music from nonsense. Time in music is as important as in everyday life, so make sure you know how to measure it. The metronome will help you play each note at the exact time it needs to be played.
A notebook?!? You’re probably wondering, why a notebook? It’s simple, if you want to be sure you are making some progress, you have to know you were bad before. It might sound strange, but every serious musician does it. You don’t have to do it daily, but try to fill your “journal” at least weekly. Write everything that comes to your mind. From what you want to achieve, to what pains you. Rewind the pages whenever you like and revisit your mistakes until you surpass them.
Stay motivated! I assure you, you won’t be able to grab a clean chord for some time because nobody did. Don’t get stressed out because you can’t play something. Just keep it cool don’t let your self-critic put you down. The technique will come, it just takes some time and a lot of positive attitudes.
The best way to assure yourself you are making some progress is by playing for someone. Practice on a tune you like, learn it and present your skill to your friends or family members. Even if you think you are not ready, just do it! It’s normal to feel anxious. And you should, this means you care! If some compliments come after your first “show” your will to keep on learning will be boosted for sure.
Holding a Guitar
The first thing you need to do before you grab a guitar is to relax! Playing an instrument may make you feel tense, with that feeling comes pain which makes playing uncomfortable. If you feel this, stop playing. Take a break and go back to your practice. This tension usually comes from your mind, but with time you’ll feel in only when you are not playing.
Make yourself comfortable while playing with a right seating position. There are a few standard stands when holding a guitar. It’s completely up to you to pick which suits you the best. Classical guitarists hold a guitar on the knee opposite to their primary hand, with a small stand underneath their foot. This might be unpractical for a regular guitar playing. What is the same for every playing style, is the position of the neck. Your neck has to be slightly tilted up, so you can see the frets clearly.
No matter which leg you are using to put your guitar on, always separate it a bit from your body. This way you’ll have a full control over the instrument.
Let’s say you are a right-handed player – Lay your right arm softly to the body of your guitar, so your hand can be close to all six strings. On the other end, your fretting hand needs to form a so-called “claw”. This means you put your thumb in the middle of the neck, crook your hand a bit until your index finger reaches the top of the neck. This might be complicated at first. Once you stretch your fingers enough, it won’t be an issue. The most important thing is that you don’t press your upper strings with your thumb. This way you won’t get a clear tone, and your other fingers will be extremely limited on the fretboard.
Always try to keep your back straight, guitar’s neck tilted and hands on their positions. Now, if your stand is firm, we can move on to the actual playing.
Tablature
Music has its own language and its called notation. Classical musicians have to know how to read it, but as a guitar player, I found much easier working with tablatures. The neck and strings of the guitar are clearly depicted. If you like you can learn the notation as well, it’s all up to you. For your first steps, it’s easier to use “tabs”.
Each line in front of you represents a string of your guitar. The top line is your bottom (first) string. You notice numbers on the tablature and some kind of order in them. Each number is a fret of your guitar’s neck. If you see a zero (0) it means this string is played without pressing any of the frets or better-said open. The “X” in the tab means you need to mute the string. You’ll achieve this with a light touch on the string with your right palm.
The numbers on the tab will also help you know which finger you should use for a certain note. It’s quite logical. Let’s say you hold your hand on top of the neck, your index finger will then be number one (1) on the tab. The index finger will always play the lowest number written. Of course, you’ll move your hand up and down the neck, depending on the numbers written in front of you.
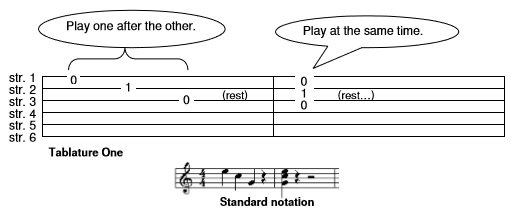
Another thing to pay attention to is the alignment of the numbers. If they are separated it means you will hit one string at the time, if on the other hand, they lay one above/below another you’ll play those strings together.
There are some other symbols you’ll find on any tablature, but we’ll leave that for another time. Let’s say, tablatures will help you create a specific sound, not just a clean tone.
Chord Diagrams
A chord diagram is a graphical representation of how to play a certain chord. Vertical lines represent your frets, while the horizontal lines represent your strings. By the numbers, you can tell which finger you should use to play a chord. If there’s a zero (0) on the diagram, don’t be confused, it means that string is played opened.

You won’t be seeing chord diagrams in the tablatures, so never mix these two. Chord diagrams are used in notations, so even if you don’t know how to read them, you’ll have a diagram to explain you how. The usual placing of the chord diagram is right of the notes that form a chord in the notation.
Tuning
In order to learn how to play properly, you need to know how to tune your guitar. If it doesn’t sound right, it can only hurt your future progress. At the beginning, you won’t notice when the guitar is out of tune, or when some string is not right.
That’s why it’s important to have two things on hand when you are learning. The first one is an electric tuner, which will help you tune your guitar with ease. But, to really learn how to tune you’ll have to have a pitch pipe. This device can also be in a form of a software so you don’t have to own it physically.
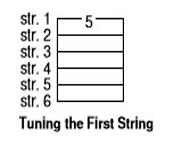
To tune your guitar with a help of a pitch pipe you’ll net to set it to emit the “Concert A” pitch. Start with your first string (thinnest string, at the bottom) by pressing your finger on the fifth fret. If the sound doesn’t match it means you’ll have to turn your tuner’s knob a bit. Do that until the sound from the pitch pipe and the sound of your first string are not identical.
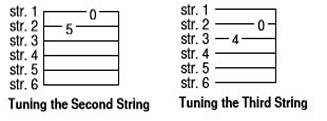
Follow the tab upwards, string by string, until everything is in order. Once you are sure each string sounds the way it should separately, play them all together to see what you get. In the beginning be sure to check if everything is ok with an electric tuner. With time, you’ll forget you even owned one, because tuning will become natural.
Playing Songs
Everything so far was a preparation for the real deal! Below is a simple tablature for a typical shuffle used in popular music. You already know how to read the tab, now it’s up to you to pick how to strum this progression.
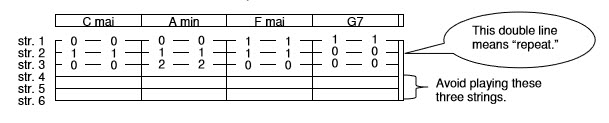
You can think of your own pattern, just keep in mind to follow the metronome. What’s also important is not to strum the unmarked strings. This is a practice for both rhythm and right-hand coordination.
Now, allow me to confuse you a little bit, what you’ve just played is known as an I-vi-IV-V-I progression in the C major key. Let me explain it to you. It can be only one major scale, but it can be played in twelve different keys. There are seven different notes in a major scale, and each of them can form a chord. Depending on its place in scale, each chord has its Roman numeral which is also its name.
You’ve might notice that some of the numerals are in the uppercase, and some in the lowercase. There is a reason for that too! The case of the numeral depends on the chord’s quality. This doesn’t mean that some chord is more valuable than the other. Major chords are marked with uppercase, while minor chords are in lowercase.
![]()
Each chord has its characteristic when it comes to its sound. There are four types of chords: major, minor, dominant and half-diminished. Major chords are happy, minor are sad and ominous, dominant sound bluesy, while half-diminished are kind of anxious version of a dominant chord. Thanks to their versatility we, as musicians, can reproduce all kinds of emotions through our music. One’s creativity lies in his/her capability to combine all of these in a unique way.
Basic Chords
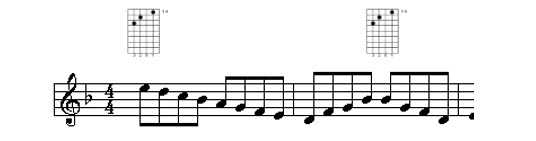
The type of chords found in most of the songs you’ll first start learning. As a matter a fact, the chords you had in the previous section are basic chords. Here you have an example of song in G major.
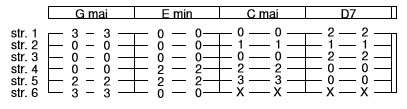
Try to play them all loud and clear, come up with some chord changes you find comfortable and follow the metronome.
Barre Chords
Here things are getting a bit more serious. Before you even start playing barre chords have in mind that they are quite tricky, and it will take some time until you can play them clear. In the beginning, you might get tired too fast. Don’t worry about it, it’s normal! This need for strength comes from the shape of this type of cord. Your index finger has to press all six strings down the fret, and at the same time, your other three fingers form a chord. In order to achieve this strength try to keep your thumb in the middle of the neck. This way you’ll gain more pressure on the strings, with less pain in your hand.
Here’s how a barre chord looks like:

Sign up for newsletter
Copyright © 2019 Alternate Tone Pte Ltd. All rights reserved.
CONTACTS
Alternate Tone Pte Ltd- Music School
29b Seah St - Singapore - 188385
Tel: +65 8115 9378
Email: info@alternatetone.com
Open: Mo-Fr 12:30-21:30
Sa 10:00-18:00
0 Comments